Running a Shopify store in India means GST compliance is not optional once you cross the threshold or sell interstate. This guide explains how taxation works on Shopify in India, how GST is calculated, how it appears on invoices, and how to set up & override taxes correctly with step-by-step visuals.
Do You Need GST for Shopify in India?
- Your annual turnover exceeds ₹40 lakhs (₹20 lakhs for services)
- You sell interstate irrespective of wether you reach the above mentioned threshold or not.
- You sell via an e-commerce platform like Shopify
Even ₹1 of interstate sales triggers GST.
How Taxes Work on a Shopify Store (India)
- Tax is calculated based on customer location
- GST is split automatically into CGST / SGST / IGST
- Tax details appear on order summary & invoice
GST Types Explained: CGST, SGST & IGST
| GST Type | Full Form | When It Applies |
|---|---|---|
| CGST | Central GST | Sale within same state |
| SGST | State GST | Sale within same state |
| IGST | Integrated GST | Interstate sale |
Example:
- Seller: Maharashtra
- Buyer: Maharashtra → CGST + SGST
- Buyer: Karnataka → IGST
Step-by-Step: Shopify Tax Setup in India
Step 1: Open Tax Settings in Shopify
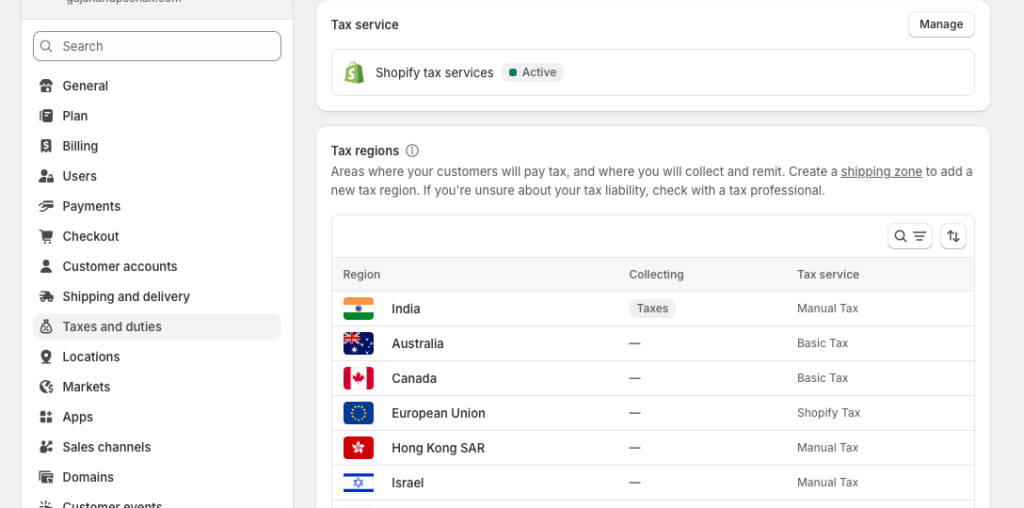
State-wise rules (follow for each state)
You will see 3 blank columns for each state. Fill them like this:
1) First blank column (Tax %)
- For all states except your own state: enter the full GST %
For your own state: enter half GST % (same as India)
2) Second blank column (Tax type)
- For all states except your own state: select IGST
For your own state: select SGST
3) Third blank column (Federal tax option)
- For all states except your own state: select “% federal tax”
For your own state: select “added to % federal tax”
Example (18% GST, business in Maharashtra)
Assume your tax bracket is 18% and your business is registered in Maharashtra:
- If the customer orders from Maharashtra (same state):
9% SGST + 9% CGST (total 18%) - If the customer orders from any other state (outside Maharashtra):
18% IGST
This activates GST calculation.

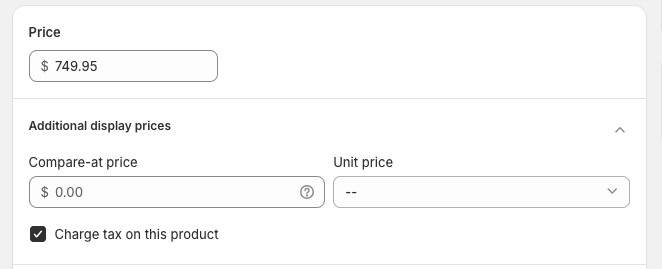
Step 2: Enable Tax Calculation on Products
- Open Product → Pricing
- Tick “Charge tax on this product”
This step is mandatory. Shopify won’t charge tax otherwise.
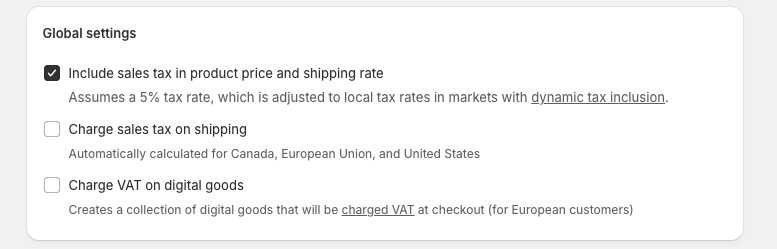
Step 3: Set Tax-Inclusive or Exclusive Pricing
Choose:
- Tax exclusive (GST added at checkout – recommended)
- Tax inclusive (GST included in price)
India typically uses tax-exclusive pricing for clarity.
enable this checkbox when you want the prices of products inclusive of taxes.
How Shopify Calculates GST Automatically
Shopify calculates GST using:
- Seller location
- Customer shipping address
- Product tax category
- Seller location
- GST registration
Calculation Logic:
- Same state → CGST + SGST (split equally)
- Different state → IGST (full GST)
No manual formulas needed.
Tax Override Functionality in Shopify (Advanced)
What Is Tax Override?
Tax override in Shopify allows you to manually define GST rates for specific products, instead of relying on Shopify’s default destination-based GST logic.
This is useful when certain products do not follow the standard GST structure setup done by you and different tax bracket is applicable (5%, 12%, 18%, etc.)
⚠️ Tax overrides should be used only when legally required. Incorrect usage can cause GST mismatches and compliance issues.
When Should You Use Tax Override?
You should add a tax override only in these cases:
- Products with different GST slabs than your store default
(e.g. books at 0%, food items at 5%, medicines at 12%)
🚫 Do NOT use tax override:
- To “adjust” GST amounts manually
- To fix wrong state-wise setup
- For normal products already covered by standard GST slabs
- To “adjust” GST amounts manually
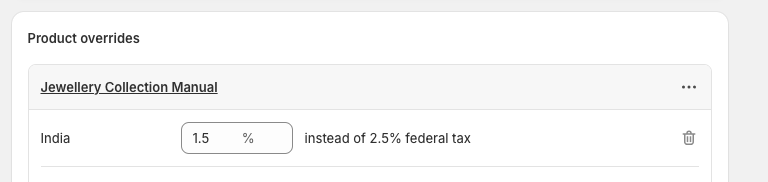
Critical Limitation: Collections & Tax Overrides
Tax overrides can be applied ONLY to:
- ✅ Manual Collections (Mnaual collection means products are manually added to collection instead of smart mapping.)
- ❌ NOT smart collections
Why?
- Shopify does not allow tax overrides on smart collections
Overrides work only on manual collections.
Step-by-Step: How to Add a Tax Override in Shopify (India)
Path:
Shopify Admin → Settings → Taxes and duties → Select country
Step 1: Choose Collection
Please note that collection selected should be manual instead of smart collection.
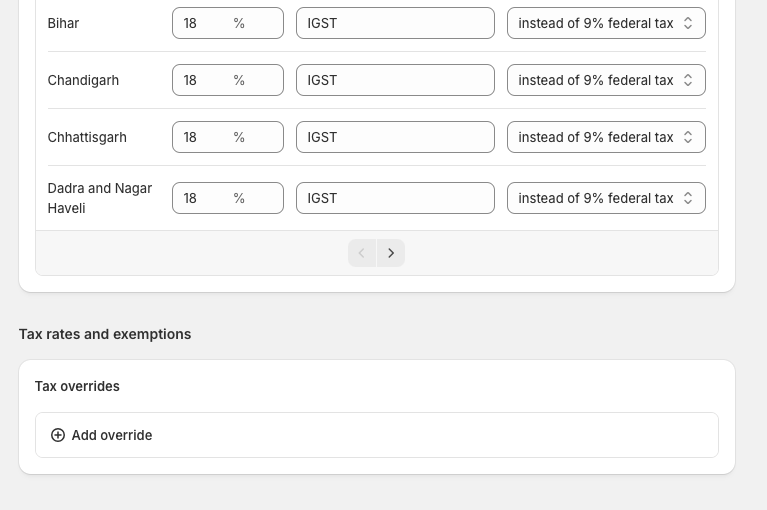
Step 2: Select location
Choose India
Or choose a specific state if required
Step 3: Enter Custom GST Rate
Tax Override – How to Enter Values Correctly (India GST)
When configuring a tax override for India, the percentages must be entered differently for India, your home state, and other states. Follow the rules below carefully.

1. India (Country Level)
For India, enter half of your GST tax bracket percentage, exactly the same way it was entered in the default tax settings earlier.
This value becomes the new base tax rate for this specific override.
2. States other than your business’s legal (registered) state
For all states except your registered business state, enter the full GST tax bracket percentage.
Example:
If the product GST slab is 18%, you will enter 18% for these states.
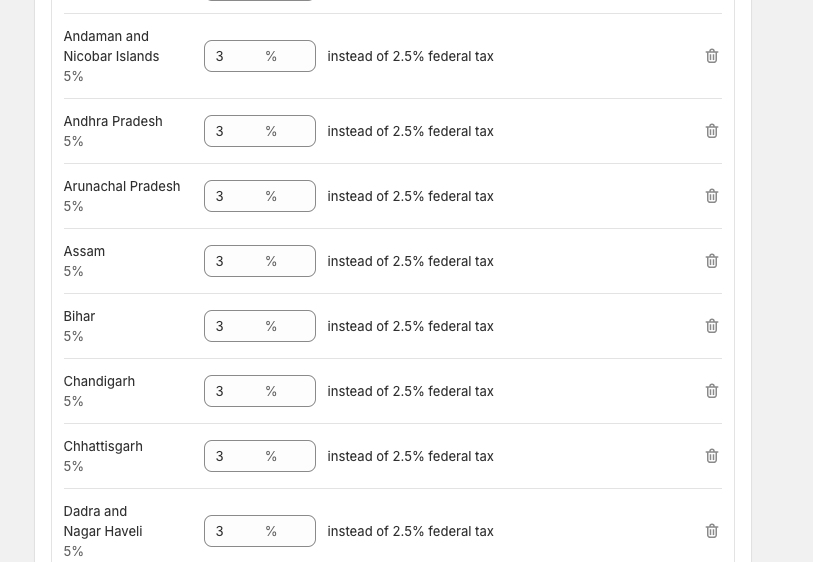
3. Your registered business state (Origin State)
For the state where your business’s legal address is registered, enter half of the GST tax bracket percentage (same method as the default tax setup).
This represents CGST + SGST split within the same state.

Important Note
When you enter the value for your state, Shopify may display it as if the percentage is being added on top of India’s default percentage.
This is only a display behavior.
In reality, the default India rate is replaced by the new percentage you entered in the override — it is not added twice.
Result
If all values are entered correctly, the tax override will function properly and GST will be calculated accurately when orders are placed.
Step 4: Save
Shopify will now apply this rate instead of default GST logic for that product.
FAQs
How do I set up taxes on Shopify?
Enable taxes in Settings → Taxes, add GSTIN, and mark products as taxable.
Do you need GST for Shopify in India?
- Yes, if you sell interstate or cross turnover limits.
How do I charge tax on my product on Shopify?
Enable “Charge tax on this product” inside product settings.
Does Shopify automatically handle taxes?
It calculates GST but does not file returns.
How do taxes work on a Shopify store?
Based on customer location and GST rules (CGST/SGST/IGST).