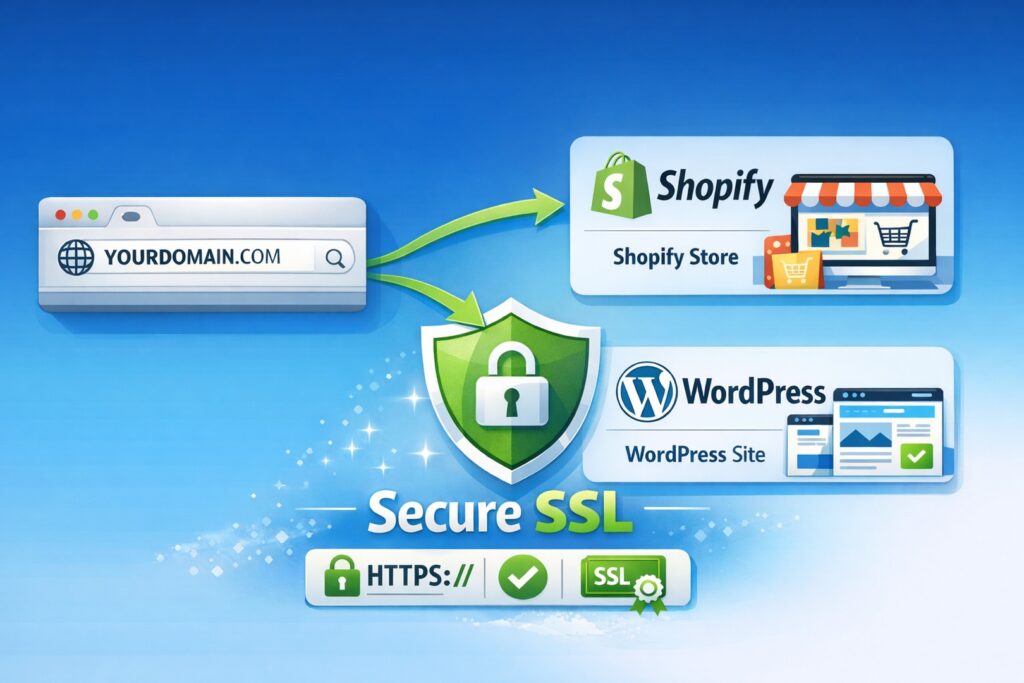
If you bought a domain (like yourbrand.com) and built your website on Shopify or WordPress, you must “connect” the domain by updating DNS settings. After that, you enable SSL/HTTPS so your site loads securely with a lock icon.
This guide teaches you everything from zero:
- What a domain is
- Where DNS lives (and how to open it)
- Which DNS records to add/edit for Shopify
- How to connect GoDaddy/Namecheap/Hostinger to Shopify
- How SSL works on Shopify and WordPress
- How to use the same domain with WordPress + Shopify (proper way)
1) Very Basics
What is a Domain?
A domain is your website address, like:
- atsstudio.com
- yourbrand.in
You usually buy it from a domain registrar (GoDaddy/Namecheap/Hostinger, etc.).
What is DNS?
DNS is like your domain’s “address book.”
It tells the internet where your website is hosted.
So when someone types yourbrand.com, DNS decides whether to send them to Shopify, WordPress hosting, Google Sites, etc.
Where do you change DNS?
You change DNS in one of these places:
Most common: Where you purchased the domain (GoDaddy / Namecheap / Hostinger)
OR
Sometimes: Your hosting company (if you changed nameservers)
If you’re not sure, don’t worry, you’ll still find it using the steps below.
2) How to “Find DNS Records"
When people say “Go to DNS Records,” they mean:
- Login to your domain account (GoDaddy/Namecheap/Hostinger)
- Open your domain
- Find a section called DNS, Manage DNS, DNS Records, or Zone Editor
That page shows a table of records like:
- A, CNAME, MX, TXT
Those are your DNS records.
3) How to Connect Domain to Shopify (Complete Beginner Guide)
Shopify needs just two DNS changes in most cases:
- A record (root domain) → points @ to Shopify IP
- CNAME (www) → points www to Shopify
Shopify’s official values are:
- A record → 23.227.38.65
CNAME (www) → shops.myshopify.com (sometimes shown with a trailing dot shops.myshopify.com.)
Step A - Add your domain inside Shopify (so Shopify knows to accept it)
- Login to Shopify Admin
- Go to: Settings → Domains
- Click: Connect existing domain
- Type your domain: yourbrand.com
- Click Next / Connect
Shopify will show instructions (A record + CNAME). Don’t worry if it looks technical, we’ll do it step-by-step.
Step B - Update DNS in your domain provider (this is where you “get DNS records”)
Now open a new tab and login where you bought the domain:
✅ If your domain is on GoDaddy: where to open DNS
- Login to GoDaddy
- Go to My Products / Domain Portfolio
- Click your domain
- Click DNS (or Manage DNS) to view DNS records
Now you’ll see a list of records.
What to change in GoDaddy (Shopify DNS)
You need to set:
1) A Record
- Type: A
- Name/Host: @
- Value: 23.227.38.65
- TTL: default
GoDaddy shows how to add/edit A records from the DNS page.
2) CNAME Record
- Type: CNAME
- Name/Host: www
- Value/Points to: shops.myshopify.com
- TTL: default
GoDaddy shows how to add/edit CNAME records from the DNS page too.
✅ If your domain is on Namecheap: where to open DNS
- Login to Namecheap
- Go to: Domain List
- Click Manage on your domain
- Open: Advanced DNS
Now set Shopify records (Namecheap also explains this).
Namecheap → Shopify records
- A record: @ → 23.227.38.65
- CNAME: www → shops.myshopify.com
✅ If your domain is on Hostinger: where to open DNS
Hostinger usually shows DNS in:
- Domains → [Your Domain] → DNS / DNS Zone Editor
Then add the same:
- A record @ → 23.227.38.65
- CNAME www → shops.myshopify.com
(Shopify’s values are the important part; the screen label varies by registrar.)
4) Shopify SSL Certificate (Beginner Explanation)
Does Shopify domain include SSL?
Yes, Shopify provisions SSL automatically after the domain points correctly. You don’t “install” SSL manually like traditional hosting.
How to enable SSL in Shopify?
You only do these two things:
- Connect domain correctly (DNS)
- Wait for Shopify to issue SSL (TLS certificate provisioning)
Shopify even notes DNS checks like ensuring CNAME points correctly and removing conflicting records (like AAAA).
“SSL Unavailable” on Shopify – what it usually means
Most common beginner issues:
- A record not set to 23.227.38.65
- CNAME www not set to shops.myshopify.com
Extra AAAA records causing conflicts (Shopify explicitly mentions removing AAAA records in some cases)
5) WordPress DNS Settings + SSL (Beginner Friendly)
Self-hosted WordPress (WordPress.org on hosting like Bluehost, Hostinger, etc.)
- Point your domain to your hosting (nameservers or A record)
- Enable SSL in hosting panel
- Force HTTPS in WordPress
Step 1 - Connect domain to WordPress (where to change DNS)
If you use self-hosted WordPress, your host gives you either:
- Nameservers (recommended easiest)
OR - IP address (then you set an A record)
Your host typically shows this inside the hosting dashboard (e.g., “Domains” or “DNS”).
Step 2 - Enable SSL certificate for WordPress (Free SSL)
Most hosts offer Let’s Encrypt (free SSL). You enable it inside hosting panel:
- Hosting Panel → SSL → Activate / Issue SSL
After SSL is active, do the WordPress part:
Step 3 - Make WordPress use HTTPS (so lock icon appears)
In WordPress dashboard:
- Settings → General
- Change:
- WordPress Address (URL): https://yourdomain.com
- Site Address (URL): https://yourdomain.com
If beginner users struggle, a common beginner-friendly tool is the “Really Simple SSL / Really Simple Security” plugin (popular WordPress plugin for SSL + redirects).
6) Can the Same Domain Be Used for WordPress and Shopify?
Can we attach the same domain to WordPress and Shopify?
Not as the same root domain.
✅ Correct setup:
- yourbrand.com → Shopify store
- blog.yourbrand.com → WordPress blog (subdomain)
This is the most common “best of both worlds” setup for e-commerce brands.
7) Quick Troubleshooting Checklist (Use This Before Panicking)
Domain not working?
- You edited DNS at the correct provider (where DNS is hosted)
- A record @ points correctly (Shopify: 23.227.38.65)
- CNAME www points to shops.myshopify.com
- Remove conflicting AAAA records (Shopify mentions this)
- Wait for DNS propagation (can take hours)
SSL not active?
- DNS is correct
- Domain is verified in Shopify
No conflicting records
8) Table: Shopify vs WordPress SSL (Beginner Clarity)
| Item | Shopify | WordPress (Self-hosted) |
|---|---|---|
| SSL included? | Yes, automatic | Usually free via host (Let’s Encrypt) |
| Manual SSL install needed? | No | Sometimes (depends on hosting provider) |
| Common beginner problem | Wrong DNS records | SSL enabled but HTTPS not forced |
| Fix | Correct A record + CNAME connection | Enable SSL and update WordPress Address & Site URL to HTTPS |